8051 Java
Posted: May 8, 2022
Introduction
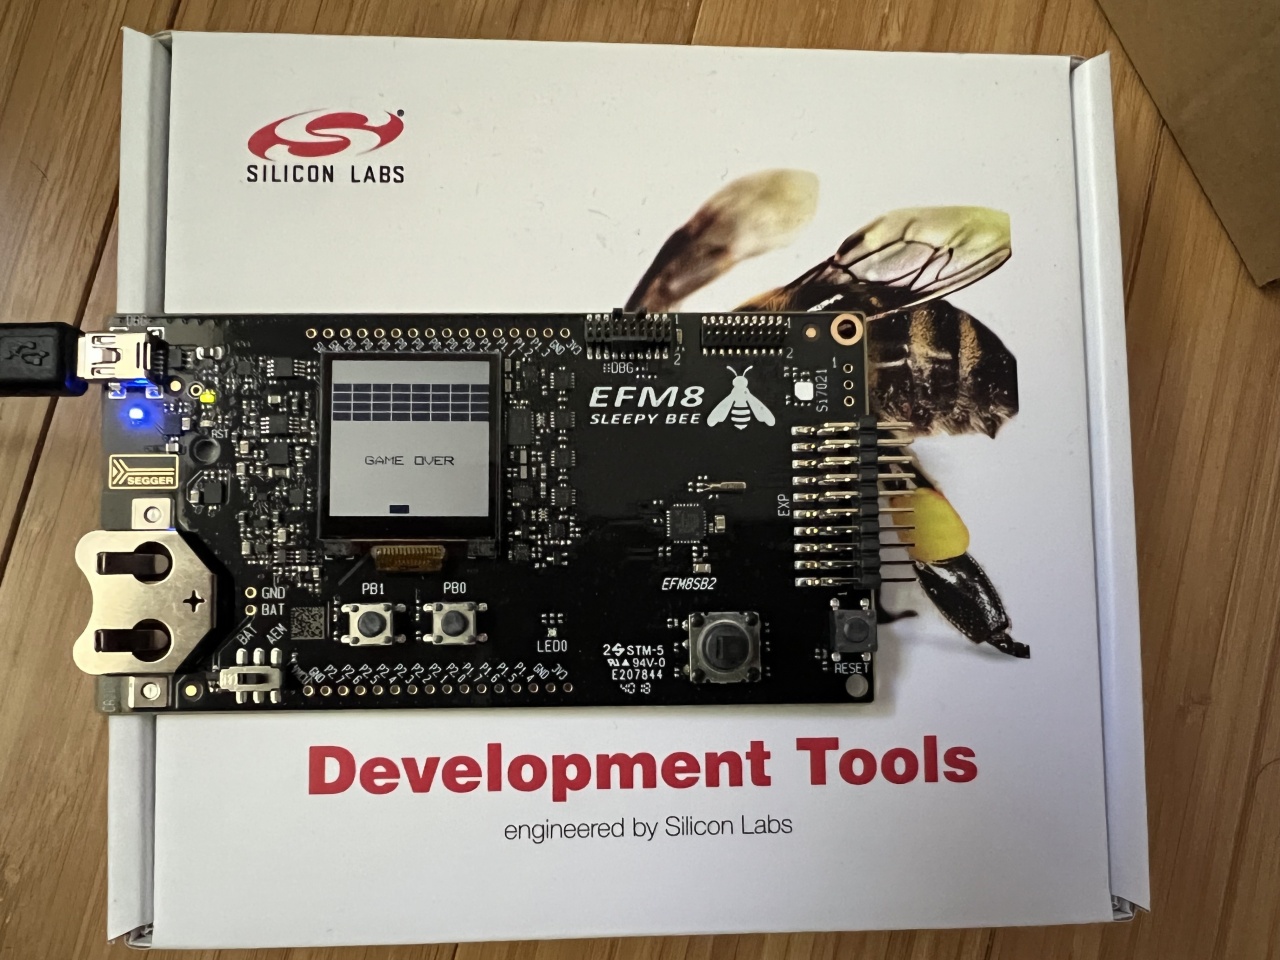
While looking for 8051 chips for a possible processor to use for Glow In the Dark Memory I ended up finding these Silicon Labs demo boards for their 8051 line of chips called Sleepy Bee (along with Laser Bee and some other Bees). I got one of their mid-range boards with the intention of adding Java Grinder support for it so these boards can be coded in Java.
The demo for this project is a clone of the Intellivision Java Breakout (which is a clone of Breakout for the Atari 2600). It would have been possible to copy some of the code from the Intellivision project, but since the APIs are different not so much would have been useful, so this is a rewrite from scratch.
Below is a video demo of the game, along with a write-up on how this works and a little bit of a review of the Sleepy Bee board. There is also source code which is published on GitHub.
Related Projects @mikekohn.net
Video
Full video: https://youtu.be/VfSmqi9rzWM
Explanation
At the center of this project is the Sleepy Bee (SLSTK2011A) board with an EFM8SB2 MCU based on the 8051. The board has a really simple to use 128x128 LCD display, some push buttons, and a joystick which is awkwardly connected to an analog to digital converter. They have different boards run somewhere between $6 and $60 depending on features. The one used here is one of the mid-ranged boards.
Despite how much I really liked this board, I was kind of disappointed in the tools Silicon Labs provides. Part of this project was to give naken_asm some exercise around the 8051 part of the assembler, so I really didn't need their tools. I'd prefer to have some simple, small command-line program for uploading my firmware to the device. Instead I had to install their SimplicityStudio, first version 5, when that didn't work I did version 4, and when that didn't work I did version 5 on a different computer. With SimplicityStudio 5 installed, I couldn't seem to get their compilers installed to try out their test programs. Fortunately, there is kind of a separate "flash" module as a part of SimplicityStudio that allows any .hex file to be uploaded, so I was able to use that program the board programs assembled by naken_asm. Probably with more time and patience (maybe talking to their support) I could have gotten their IDE working fully, but didn't really need it. The other thing that was maybe lacking was the documentation and simple examples. Microcontrollers from other companies usually have small snippets of code showing things like how to initialize and send / receive from SPI that can be cut and pasted into code to save time.
To say it again though, I still really like this board and glad I got it. Very highly recommended for anyone who wants to get into 8051 programming.
After getting the dev environment the next step was to just write some simple programs in assembly that used SPI, blinked LEDs, and read data from the ADC to prove how to get those things working and to have code that can be copied into the API parts of Java Grinder. The sample program was added to naken_asm's git repo: sleepy_bee.asm. The code will blink the tri-color RGB LED, set one of the LEDs if the joystick is moved, and will draw stripes on the 128x128 LCD.
Speaking of the LCD, this was, from a programmer's standpoint, the easiest LCD I've used. It's basically a 1 byte command, 1 byte saying which line to update, 16 bytes of data to draw, and 2 bytes of 0. What was really odd though, is that the byte representing the line appears to need to be transmitted backwards. In other words if line 2 needs to be updated, the chip needs to write that as 0x40. I kind of thought maybe the data was backwards too, so I originally did the SPI in software shifting out the least significant bit first, but after realizing it seems to just be the line, I switched it to hardware. Anyway, most other LCDs seem to have a lot of setup bytes to even get it into a mode where it will display things, while this one just works.
The next step to the project was to add 8051 (MCS51.cxx) support to Java Grinder and then later extend it to SleepyBee.cxx for specific peripherals of the Sleepy Bee chip (ADC, SPI, etc). Being an 8 bit instruction set, that always make it a challenge, but the instruction set didn't help much either. The chip has 8 registers (r0, r1, r2, etc) plus an A (accumulator) register, but only A is allowed to be used with ALU math instructions. r0 and r1 can be used for indexing and a special 16 bit DPTR register is used to index / read code memory and the external SRAM that the Sleepy Bee provides. So for Java Grinder, r7 is being used to point at global variables (statics), r6 is being used as a frame pointer for local variables in a function / method, and r5:r4 points to next free area of XRAM, where arrays are stored.
So arrays on this board ended up being interesting too. If the Java program contains an array that is defined in the program such as:
static public byte[] bricks = { 9, 100, 99 };
These arrays end up as .db sections in the main program, so they end up being hardcoded in flash memory. So if the user does bricks[1] = 33; to change it, that would have been read-only memory so it wouldn't have worked. To take care of that, all arrays from flash are memcpy()'d to XRAM when the program starts up. Any arrays that are allocated with "new" are also placed in XRAM.
So, like the other 8 bit CPUs in Java Grinder, this CPU is treated as 16 bit in software. In other words, even though the Java program defines a variable as int, and in Java int is supposed to be 32 bit, an int variable will overflow at 16 bit. This is done for performance reasons. In Java Grinder, all CPUs that aren't 32 bit in hardware are treated as 16 bit.
Because only the accumulator can be used for the ALU, doing 16 bit math and such requires a minimum of 6 instructions, sometimes more. For example, subtracting two values on the Java stack is done with:
  ;; sub_integer()
  mov A, 8
  clr C
  subb A, #0x01
  mov 8, A
  mov A, 9
  subb A, #0x00
  mov 9, A
Despite this and some other awkward things, this was a pretty fun chip to work with.
Source
Copyright 1997-2026 - Michael Kohn
