Michael Kohn
Nintendo 64 Programming
Posted: November 28, 2022
Introduction
Since I've been learning how to write code for the Nintendo 64, I figured it'd be good to post things that I'm finding for my own future reference, and hopefully it could possibly help others who want to learn from what I know. All of the code was used to create the Nintendo 64 API in Java Grinder API and the demo with it.
I also have a similar page for Playstation 2 programming on this website.
References
There are several places I've collected PDF's and such, and I can't remember where they all came from, but these sites have been the most useful:
Useful PDF files:
- SGI Nintendo 64 RSP Programmer's Guide.pdf
- SGI RDP Command Summary.pdf
- Reality Coprocessor.pdf
- vr4300.pdf
naken_asm
The start of this project was to add the Nintendo 64 RSP to naken_asm. The RSP is basically a MIPS chip minus a bunch of instructions and features (no 64 bit, I believe no exception handling, etc). It also has some.. kind of very awkward SIMD vector instructions. There is no direct multiply or divide instructions, instead the RSP has a weird SIMD multiply and a very very awkward reciprocal instruction that can be used for doing division. More on that later.
The second part of the graphics system in the N64 is the RDP which can be used to draw rectangles and triangles and can handle textures and the Z buffer (a memory region that helps the hardware decide if the current pixel being drawn is hidden behind a pixel that has already been drawn).
In the naken_asm repo is a samples/nintendo64/ directory with most of the code I wrote to learn how the system works:
- sample_no_rsp.asm
- sample_rsp_hardcoded.asm
- sample_rsp_rectangle.asm
- sample_rsp_rectangle_texture.asm
- sample_rsp_triangle.asm
- sample_rsp_rotation.asm
- sample_rsp_rotation_z.asm
sample_no_rsp.asm
I started with a small sample program (included in the naken_asm git repo) called sample_no_rsp.asm that intializes the display with the top part being blue and the bottom brown. Then used the RDP to draw 2 squares and 4 different types of triangles. These triangles were calculated with a Python script that's included in the samples directory of naken_asm.
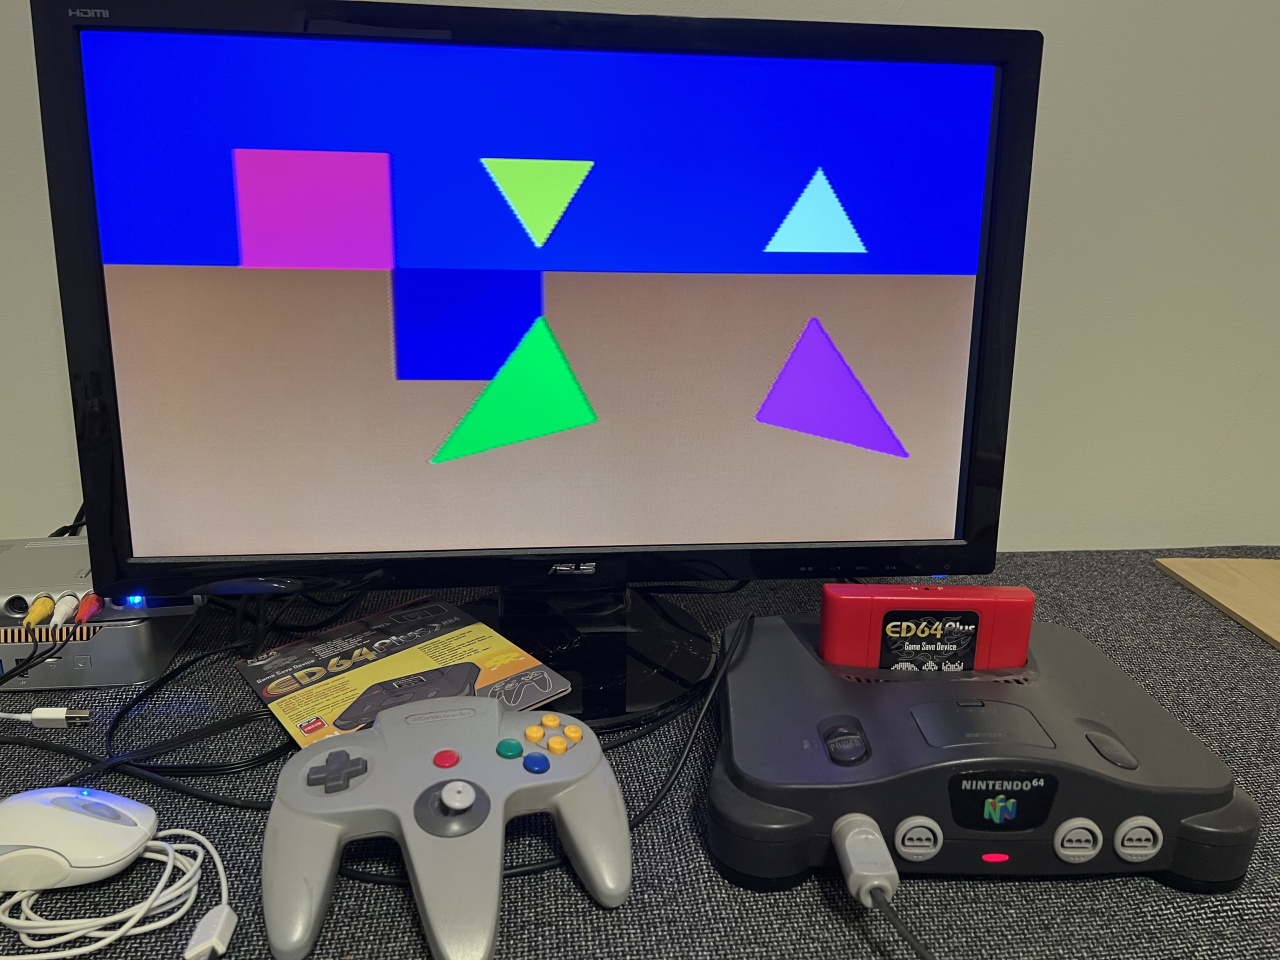
The picture above shows a real Nintendo 64 running sample_no_rsp.asm from the naken_asm git repo. The code is loaded from a microSD card using an ED64 cartridge.
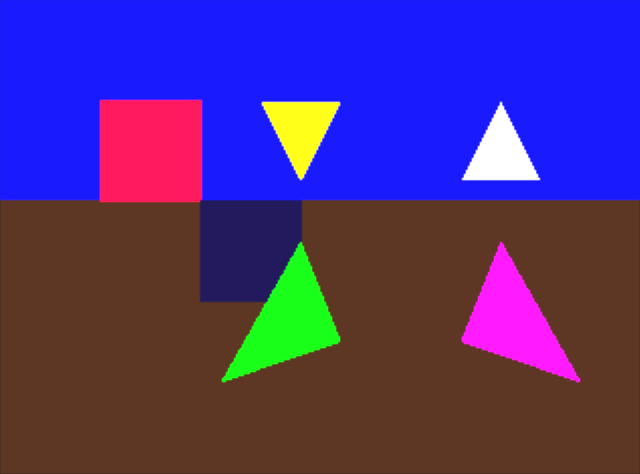
Here is the same program running on the Cen64 emulator.
There's kind of 4 parts to this program. The very top of the program is the catridge header. It seems like I found multiple people with different formats of how this should look. What's currently in the sample program seems to work.
The second part of the program is some system initialization code that I named bootcode.bin. I basically just downloaded this from Peter Lemon: BOOTCODE. I named it bootcode.bin and dropped it in the same directory as the source code so it gets pulled in when the code is assembled.
After the 'start:' label is some more initialization code and then code to write some data to the video memory of the N64 (the blue on the top and brown on the bottom).
The next part under the 'setup_video:' label sets up the video display. All of the values here came from the Reality Coprocessor pdf file under the "Sample VI Values" section with typical values for 320x240 16 bit NTSC.
The final part is the RDP. This is the hardware inside the N64 that can draw polygons (triangles and squares) both textured and solid. The code here starts with waiting for vertical blank. This is really not needed. The next is to wait for End/Start values to be cleared. I'm not sure if that's actually needed either, but the same PDF claims that games are waiting for the bits to be cleared and not doing that can freeze the machine.
sample_rsp_hardcoded.asm
This is pretty much the same as the sample_no_rsp.asm program except for the RSP (using rsp.asm. ) is used to trigger the RDP to draw polygons rather than signaling the RDP to start from the main MIPS CPU.
sample_rsp_rectangle.asm
This code passes the (x0, y0) to (x1, y1) coordinates to the RSP along with the color of the rectangle and lets code in rsp.asm. calculate what RDP commands to generate before triggering the RDP to draw the rectangles.
sample_rsp_rectangle_texture.asm
This is the same as the sample_rsp_rectangle.asm program except instead of drawing the rectangle as a flat color, it instructs the RSP to draw a texture on it.
Textures in this system are quite awkward. In memory they have to be aligned to a byte size, which is probably not a big deal. If the texture isn't wide enough to be aligned properly it can be cropped when drawn.
What made this part difficult compared to the Playstation 2 is that the programmer has to tell the RDP the value for DsDx and DtDy so the hardware can figure out how to scale it. Basically (S, T) points to the next pixel in texture memory to copy. So the programmer provides a start (S, T) coordinate in the texture and DsDx tells the hardware every time it moves to the next pixel to the right how much to increment S. This is the same for T as the hardware moves to the next line to copy.
The code in rsp.asm works perfectly with the MAME emulator but for some reason is glitchy on Cen64 and the real hardware. I have no idea why.
sample_rsp_triangle.asm
This example shows how to pass 3 coordinates of a triangle to the RSP and has rsp.asm draw the triangles. Drawing triangles in the N64 is quite a lot work compared to the Playstation 2. Playstation 2 allows the coordinates to be passed along with texture info, color at each vertex, etc and it just takes care of everything. Just drawing a triangle on the N64 requires setting up a starting (x,y) coordinate, a slope on the left and right side of the triangle until it reaches the middle vertex, and then the new slope on the side of middle vertex to the bottom vertex.
Maybe a very simple example would be this: If there is a triangle that has a shape like this:
         *          <--  YH
        ***
       *****
      *******       <--  YM
     ******
    ****
   ***
  **
 *                  <--  YL
So in the RDP packet, the starting top Y location first needs to be set. This is set in the YH field. The second thing that needs to be set is the YM field (this is where the slope on the left side, or right side changes depending on if it's left major triangle or right major), and then there is YL, this tells the RDP to stop drawing. So if the top vertex of the triangle is (50, 100), YH will be 100 and if the bottom vertex is (42, 108) then YL will be 108. YM will be the scan line where the triangle changes direction (the location of the second vertex) so in this case YM will be 103. Note that because of this setup, the vertexes have to be sorted from top to bottom.
Now there is XM and XH. These are the X coordinates of where to start above the triangle. I believe the rsp.asm code just sets XM and XH to be the same just to keep things simple, but for more accurate triangles XM and XH could be different values. This can happen if the slopes don't quite work for XM = XH.
For a left major triangle, the RDP will basically draw from XM to XH on every line. So to actually draw the shape of the triangle, XH and XM must change every time it advances a line. So DxHDy and DxMDY are used to tell the RDP how much to add to XH and XM every line until it reaches YM. So in the picture above, DxHDy would be -1 and DxMDY would be 1 since the triangle moves left 1 pixel on every line and right 1 pixel on the right edge. After passing YM, the triangle will draw from XH to XL and again DxHDy applies to the change in XH for every line while DxLDy (in this case -2) would give the change in XL for every line. For a right major triangle, the XH and XM positions are reversed. Page 15 of the SGI RDP Command Summary pdf has a decent diagram of how it works.
The code to do this is wickedly ugly in rsp.asm.
sample_rsp_triangle_rotation.asm
This is the same as the sample_rsp_triangle.asm example except it allows the passing of rotation values around the x, y, and z axis. The rsp.asm calcuates the new vertexes bases on the rotation.
sample_rsp_triangle_rotation_z.asm
This is the same as sample_rsp_triangle_rotation.asm except it will use the Z buffer to filter out pixels that should be hidden behind triangles that were drawn earlier.
The Z buffer is a 320x240x2 area in memory that if flags are set in DP_OP_SET_OTHER_MODES for it will automatically not draw a pixel or if it draws the pixel set the new value in the buffer.
The Playstation 2 was so nice with the Z buffer because the programmer simply passes the Z value for each vertex to the hardware and the hardware automatically calculates the Z value of every pixel in the triangle. In the N64, the user has to pass a starting Z value for the top vertex of the triangle and then pass DzDx (change in Z as X changes), DzDy (change in in Z as Y changes), and DzDe (change in Z down the long edge of the triangle). The DzDe value kind of made sense to me, but I had no idea what DzDx and DzDy were supposed to be. I couldn't find any good documentation on this. After screwing with it for a while I basically punted on it. The rsp.asm code will set the start Z value as the top of the vertex and never changes it.
RSP
The RSP microcode is all in rsp.asm in the naken_asm repository. There's also a math.inc file that has macros to do divide and different types of multiplies. Pretty much everything there was just copied from the SGI Nintendo 64 RSP Programmer's guide. The macros have extensions at the end that tell what sized numbers they can multiply. For example MULTIPLY_IFxI means it will multiply a number that is made up of a 16 bit integer and 16 bit fixed point float by a 16 bit integer and return a 16 bit integer and 16 bit fractional piece.
I found the documentation for the vector instructions kind of confusing so I pretty much took their examples, adjusted for what rsp.asm needs, and moved on.
The RSP has 4k of data memory and 4k of program memory. The 4k of program is used to hold the microcode and it appears there are no instructions to access program memory from the microcode. So things like the cos table needed to be loaded by the N64's main CPU into data memory from locations 1024 to 3071. At the very bottom of data memory, there is an 8 byte scratch pad used by the microcode to store values. At the very top of memory is information that's passed from the main CPU to the RSP before doing work. For example, to draw a triangle locations 8 to 55 are used to defined the triangles vertex locations, rotation values, color, and position on the screen. Byte 0 is used to signal the RSP to start and the main CPU can query byte 0 to see if the RSP is busy. All writes to the RSP's DMEM must be 4 byte writes.
The microcode is capable of the following commands:
  ;; Command 1: Call start_rdp only for screen setup.
  ;; Command 2: Directly call start_rdp.
  ;; Command 3: Calculate triangle and call start_rdp.
  ;; Command 4: Calculate rotation, projection, triangle, and start_rdp.
  ;; Command 5: Draw rectangle.
  ;; Command 6: Draw rectangle with texture.
  ;; Command 7: Load texture into TMEM.
  ;; Command 8: Clear screen.
  ;; Command 9: Reset Z buffer.
Sound
There aren't any examples of sound in naken_asm repo, but Java Grinder supports it. This part is actually pretty easy. There are just 6 registers as defined in audio_interface.inc. For the most part it's just: point to the PCM data, set DAC rate, set bitrate, set the length of the sound file, and set a flag in AI_CONTROL_REG to start.
Issues
Some things I ran into while creating the sample programs:
- All instructions to copy from the main CPU to IMEM / DMEM must be word size. When using half-word copies it seems the other half of the word is cleared out.
- Due to limited documentation, I had a hard time figuring things out.
- Textures are glitchy when they are streched bigger than the original image. Oddly they work perfectly on mame, but on Cen64 and real hardware they are glitchy.
Running
I've tested several emulators and a real Nintendo 64 to test sample_no_rsp.asm. The results are:
- Nintendo 64 (real hardware): Works.
- Cen64 Emulator: Works.
- Mame Emulator: Works. This emulator is very slow.
- Mupen64plus Emulator: Black Screen.
- Ares Emulator: Works but appears to use MAME.
Copyright 1997-2026 - Michael Kohn
