Nintendo 64 Java
Posted: January 12, 2023
Introduction
Nintendo 64 was probably the first Nintendo system I was ever interested in (even though I never owned one until starting this project). With a MIPS CPU and based off of the SGI Indy computer, it was just intriguing. Plus everyone knows that RISC architecture is gonna change everything. Since Java Grinder already supports MIPS for the Playstation 2, I figured Nintendo 64 should be pretty straight forward to implement. Unfortunately, the simplicity of the hardware made the implementation a more complicated job. Actually, I should rephrase that a bit, it was painful.
The end result is a graphics / music demo written in Java with .class files that get compiled from Java byte-code to R4000 MIPS assembly so it runs on a Nintendo 64. The API has some 3D routines that call custom functions in the N64's RSP graphics co-processor (written directly in assembly language) to do the calculations.
After learning parts of the hardware and coding up some examples, I created a Learning Nintendo 64 page with information on some of the things I learned in case I wanted to look back on it to figure out what I did and also in case someone else is interested. The page here will be more about the Java Grinder coding and do some comparisons with Playstation 2 programming.
Special thanks and shoutout to Peter Lemon (aka Krom) and Simon Eriksson (aka simer) for coding examples and tips!
Related Projects @mikekohn.net
Videos
The demo unfortunately doesn't represent how much work it took to get this done and the complexity of the project. I guess that's going to equal a lot of thumbs down on YouTube from people stumbling on the project and not understanding what was really done. Other than the core of Java Grinder and the MIPS support in naken_asm, this project was started from scratch all the way down to the assembler for the RSP to the 3D routines written in MIPS/RSP assembly language.
YouTube: https://youtu.be/PRFPHiESpH0
The demo is:
- Java Grinder 3 billion devices screen.
- Rotating Java Grinder text: Each letter is drawn as a texture on a 16x16 rectangle that eventually shrink and stretch. There's also a rectangle, spinning triangle, and "copper bar" to try to tax the CPU.
- Swarm of triangles spelling out JAVA. The swarm is rotated using 3D routines from the Matrix3D.java class (executed in the main CPU) while the actual triangles themselves are drawn with the RSP 3D routines.
- Swarm of triangles spinning and bouncing around.
- Java Kong. The structure and ladders are drawn as rectangles with textures made with The Gimp. The Java mascot Duke is also a texture on a rectangle and runs up the structure.
- 145 triangles and a JAVA texture that stretches and shrinks. The stretching starts to show some artifacts on real hardware and Cen64, but don't show up in MAME. I couldn't figure out why that happens and was too burnt out to continue looking into it.
- Swarm of triangles spelling 2023. Pretty much the same as the JAVA swarm, but this time the triangles are 4 different colors and the RSP drawn triangles rotate around the Z axis too.
- Credits screen.
The demo was recorded twice, once through a camera pointed at the screen in order to show it's running on a real N64 and then composite out on the N64 was connected to a DVD recorder so the entire demo is really running on real hardware. Apple iMove was used to play the camera video first and then break to the DVD recorded video.
Explanation
This project spanned a period of about 2 years, pretty similar to what the Playstation 2 Java project was. Similarly, it was done in some short (dare I use an Agile word) sprints while taking long breaks to do other projects in between.
The first part was to add an assembler to naken_asm for the RSP module, which is basically a stripped down MIPS core along with some extremely awkward vector instructions. Actually, I shouldn't be so negative, Nintendo 64 and the design of the RSP was revolutionary, but compared to newer vector instruction sets such as MMX/SSE/AVX and what the Playstation 2 had, this ends up being more work.
The next part was to learn the hardware. A number of samples were added to samples/nintendo64 in the naken_asm git repo as I was learning how to initialize the hardware, draw rectangles, triangles, etc. On top of that I wanted to write my own RSP routines to do all the 3D calculations and triangle calculations and such so I created rsp.asm in the naken_asm samples directory which is also used by Java Grinder. I believe there was a standard RSP microcode that Nintendo created that a lot game makers used and also some newer open-source microcode that the homebrew crowd is using, but I was interested in exercising naken_asm and also learning for myself how it all works.
The Java API is fairly straight forward with just three objects for clearing the screen, plotting pixels, playing audio, drawing rectangles, and drawing triangles:
The Hardware
In an odd way, the hardware of the Nintendo 64 is similar to the Playstation 2. Both are based on the MIPS CPU (R4000 for Nintendo 64 and R5900 for Playstation 2), so in Java Grinder the generic MIPS code from R5900.cxx was moved to R4000.cxx and the R5900 class was changed to extend the R4000 class so the Playstation 2 could take advantage of some beefier instructions if they are needed. Off the top of my head, the biggest difference between the R4000 and R5900 is the R4000 has 64 bit registers and is pretty straight forward 64 bit while the R5900's registers are 128 bit (128 bit load / store if needed) but 64 bit math and 128 bit vector instructions. Both CPUs can treat registers as either 32 bit or 64 bit pointers depending on a changable setting in the CPU. Both systems seem to default to 32 bit pointers, which makes sense for their hardware.
Along with the R5900 having its own vector instructions, the Playstation 2 has a couple separate massive vector units for assisting in 3D computations and such. The vector units are really not very general purpose, they are VLIW where they execute 2 instructions at the same time (one vector and one 16 bit integer). One of the Playstation 2's vector units can send polygon instructions directly to the graphics processor. They both run independently of the main CPU, so all 3 cores can be running their own separate programs at the same time.
Similarly, the Nintendo 64 has the RSP coprocessor which can be used to do 3D rotations, projections, etc. I found the vector instructions in the RSP to be extremely awkward. For the most part they are 16 bit only and there is no division instruction, just an awkward reciprocal instruction and awkward multiply instructions. There's more about that on the Nintendo 64 programming page.
The rsp.asm code takes care of things like clear screen, reset Z buffer, rectangles, textures, and triangles. The code is very unoptimized, it was written more to be as readable as possible (if that's possible). For example, in order to guide programmers to avoid CPU stalls, on page 43 of the SGI Nintendo 64 RSP Programmer's Guide is Mary Jo's Rules... and I broke every one of them. Rock N' Roll!
Those same types of rules applied to the R5900 and I didn't optimize for them in the Playstation 2 code either.
Next to the RSP is an RDP which is similar to the Playstation 2's GS. The RDP can take a list of commands (draw a rectangle, draw a triangle, etc) and execute them. The RDP itself feels very primitive compared to the Playstation 2. On the PS2 drawing a triangle was as easy as passing 3 coordinates of X, Y, and a Z value for the Z buffer. The hardware would just compute the triangle along with all the Z values for every pixel in the triangle. The Nintendo 64 instead takes some information on where to start drawing along with the Y coordinate of when to changes direction, Y coordinate of where to stop, slopes of the lines of the triangle. All these things have to be calculated by the RSP or CPU software before they are passed to the RDP. Textures, shading, and Z buffer also had to have these awkward calculations made. The Playstation 2's graphics chip did textures, shading, and Z buffer calculations in its own hardware.
I actually found all that coding to be pretty unfun. I've seen people complain that the Playstation 2 was difficult to code on (in some ways I kind of see why, and in other ways the PS2 seemed pretty straight foward and easy to me)... but Nintendo 64 was exhausting. I ended up not implementing as many features because I was getting burnt out working on this and wanted to get some other projects done.
And speaking of being burnt out, I also didn't fully implement the Z buffer because of this. The Z buffer gives the hardware a way to decide which pixels of a triangle need to be drawn and which need to be discarded because there is another part of a triangle infront of it. The documentation on the Z buffer for Nintendo 64 was kind of lacking a bit, so I implented each triangle so the Z value of all the pixels is the just the value of the top vertex. Unless two big triangles cross through each other, it should be unnoticable.
The Playstation 2 Java Grinder API has the ability to do vertex shading and triangle textures and such. Those things are also very well supported by the hardware and take very little extra code to implement. On Nintendo64, just the shading requires setting up 32 different parameters to tell the hardware the colors and how they change as the triangle is being drawn. I was just way to burnt out to even look into it.
Music
The song itself was started a simple Drums++ file (included in git repo as song.dpp). The song was imported into Apple's Garage Band software where a simple bass line was recorded line-direct. The rhythm guitar line was recorded with a Line 6 Pod Go using the "wah" pedal and played through a Mini-Marshall amp that runs on a 9v battery and my tiger striped guitar with Lace Sensor pickups mic'd with a Shure SM-57. The lead guitar line was recorded with my scalloped Fender Strat with DiMarzio Cruiser pickups also mic'd and recorded with a DigiTech RP-55 through a smallish Bugera tube amp.
The full 16 bit / 44kHz mp3 of the song is here: java_kong.mp3
I was kind of trying to make the song sound like 8 bit style music with real instruments. I've been told by multiple people the "wah" part sounds like 1970's / 1980's porn music.
I wasn't sure how long of a song I could fit in memory and needed about 1 minute worth so the idea was to record 1 minute of a song with distinct sections that could be cut up. This way if there isn't enough memory the Song.java module could just sequence a bunch of cut parts of the recording. Or in the worst case just keep repeating the wah-wah part. It ends up that at 16 bit / 11kHz it was only 1.7MB. The song is still sent in pieces since the N64 audio hardware can't handle being told to play more than a certain size chunk of memory at a time, but the whole song fit. The only problem ended up that when the N64 hardware boots, it copies the first 1MB of the cartridge into RAM. I actually didn't realize this and after struggling for a bit on why only half the song seems to play, I added code to copy the second chunk of 1MB from the ROM of the cartridge into the next 1MB of RAM.
Emulators
I ended up testing with Cen64, Aries, and MAME emulators. MAME ended up being the most useful since it was easy to have it stop in the middle of emulation and examine memory and such. Unfortuntely, they didn't seem to make a way to examine texture memory (unless I missed something).
The big problem with MAME is it couldn't run the demo very fast. Without MAME though I'm not sure I could have got this working right. So many times when things weren't working I was able to open MAME with their debugger and have the ability to inspect memory and such. Life saver. With Cen64 running in a VM was almost full speed of the real hardware which was perfect for testing to make sure graphics were moving correctly before having to pop out the cartridge, copy to the SD card, put it back, and start up real hardware.
Running On Real Hardware
To test on real hardware I got an ED64 cartridge (cheaper EverDrive clone?) that allows N64 image files to be read off of microSD cards. I also ended up getting a real machine from Mercari. I was almost tempted to get the offical EverDrive 64 X7, which has a USB port for debugging, but holy hell that thing is expensive. When I had problems on real hardware, commenting out code and swapping the SD card constantly until it stopped crashing or such worked okay. I didn't count, but I must have swapped out that SD card at least 50 times, not only for debugging but also to adjust how the demo ran on real hardware.
Now that this project is done, I guess that N64 has to go back to Mercari... along with the Sega Dreamcast in my closet that I no longer want to finish working on.
Pictures
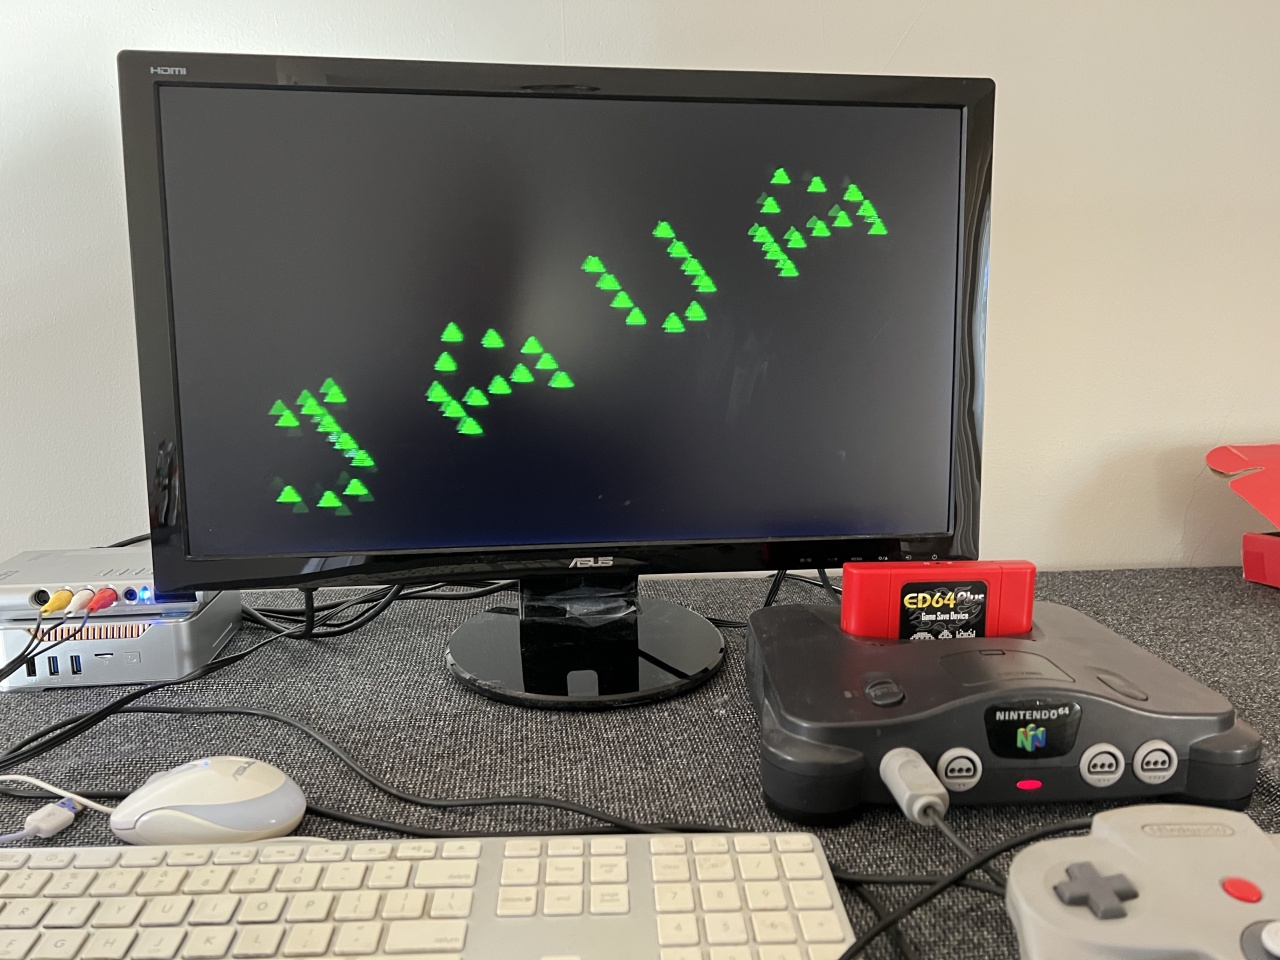
Here's a picture of the Nintendo 64 while it's runing the demo. To the left of the monitor (on top of a mini PC) is a composite to VGA device. To the right is the Nintendo 64 with the ED64 cartridge inserted.
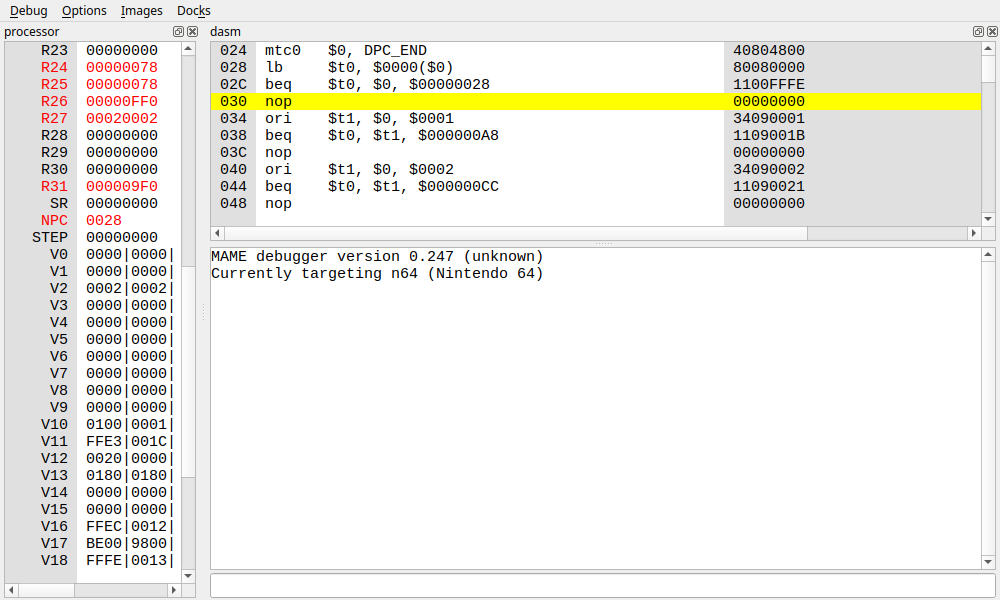
This is the MAME debugger view showing the currently executing instruction in the RSP when it was paused. On the left shows the values of all the MIPS registers along with the vector registers. This was an absolute life saver for this project. I used it, for example, to execute a series of vector instructions and examine the "v" registers after they execute to figure out how they work. When sound wasn't working I was able to examine RAM around location 0x10_1000 to see that those memory locations had the sound data but after that address it was blank. The RSP data / instruction memory was also visible so I could see if data was correctly copied from the the main CPU to the RSP. The one thing that was missing that would have been really helpful is the ability to examine texture memory. Or if it was there, I just couldn't find it.
Building The Demo
git clone https://github.com/mikeakohn/nintendo64_demo.git
git clone https://github.com/mikeakohn/java_grinder.git
git clone https://github.com/mikeakohn/naken_asm.git
cd naken_asm
./configure
make
cd ..
cd java_grinder
make java
make
cd ..
cd nintendo64_demo
make rsp
(copy bootcode.bin from Peter Lemon's repo)
make
Final Thoughts
I have to admit I didn't have an much fun working on this system as I did the Playstation 2. It's a really neat advanced computer, especially for 1996, but it took so much work to do the smallest thing. Most likely most game devs used someone else's RSP code, making it much easier to program on, but to get a better feel for the system I wanted to make my own.
Copyright 1997-2026 - Michael Kohn
