TI99/4A Java
Posted: April 11, 2015
Introduction
Many years ago, a friend of mine gave me a TI99/4A computer. I turned it on one time just to make sure it worked (some of the keys on the keyboard don't work.. may be fixable) and then put it away for a long time. Recently I thought it might be cool to make Java Grinder work with it so I started writing a module for the TMS9900 and then a small API for the TI99/4A hardware that would allow printing to the screen, sprites, sound, and low-res graphics.
Related Projects @mikekohn.net
Explanation
This ended up being a pretty awkward system. The CPU, a TMS9900, only has direct access to 256 bytes of RAM and could only access video / sound registers by reading / writing a couple memory addresses. There is a chunk of extra RAM attached to the video processor, but I decided to just use the 256 byte area for variables. I figured it's not like anyone is going to use this for anything serious anyway.
Almost all my information on programming the TI99 came from this page: https://www.unige.ch/medecine/nouspikel/ti99/titechpages.htm.
Full video: https://youtu.be/Gk1-TjF576A
For a binary of the demo to run on an emulator (or a real system) click here: grinder_demo_ti99.bin
The above video shows my TI99 Java demo running first on the real TI99/4A system and in the second part the same program running in the Mess emulator. The emulator was extremely helpful in the development of TI99 / TMS9900 since it had a built in debugger. I could set break-points, examine registers / memory, etc.
When the demo was complete, I wanted to get it running on the real TI99/4A my friend gave me. Luckily he also gave me 3 cartridges: Hangman, Parsec, and Popeye. I started out by taking the Hangman cartridge apart, but unfortunately it had just one small chip in it (I think it's a TI99 GROM). So next I took Parsec apart, but that had what I thought was too many chips (actually, the EEPROM on there was a smaller chip than what would be useful for me). I finally decided to open up Popeye to see if that cartridge could be used, but unlike the other cartridges, this one had no screw and was sealed shut, maybe with glue. I had to open this one up like opening up a coconut: with a hammer. Although I tried to be careful, I ended up cracking the EPROM inside and part of the PC board.
The EPROM was 28 pin (I assumed 8k) so I logged on Jameco.com and found 2 EEPROM's and 1 EPROM that I thought could work along with some sockets. The parts I actually used are (linked to Jameco): AT28C64B and 28 Pin Socket
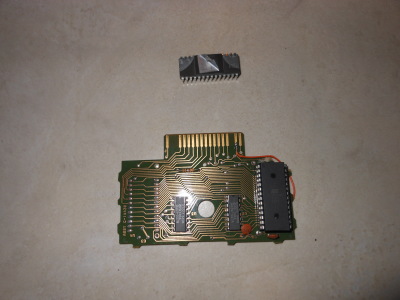
I was assuming that I'd have to connect this EEPROM to a breadboard and rig some wires from the cartridge to the board, but the this EEPROM had the same pinouts as the original EPROM. I fixed the broken cartridge PC board by soldering a patch wire (as seen in the picure below) and programmed the EEPROM with a Wellon VP-280 universal programmer.
When I first plugged the hacked up cartridge in all I got is a blank screen and a horrible screeching sound from the TV. The Popeye chip had 2 extra chips on it (GROMs again?) so I wondered if they were causing something. I desoldered them and plugged the cartridge back in.. and it worked!
This is the TI99/4A Popeye cartridge. The EEPROM programmed with the demo is in a socket on the cartridge PC board. At the top of the picture is the original EPROM cracked with the sticker that covers the UV window partially removed. At the top right of the cartridge, there is a piece of PC board that broke off when I cracked it open with a hammer. The copper trace with the chip select signal was severed so I patched it by soldering the orange wire from the cartridge pad to the EEPROM socket pin.
Copyright 1997-2026 - Michael Kohn

